Multiple Event Registration
The Multiple Event Registration (MER) upgrade will create a shopping cart experience on your site. Your registrants/attendees will be able to add tickets from several events to a shopping cart and then complete registration checkout once (instead of once per event).
An active subscription for the Multiple Event Registration feature upgrade is needed to use the shopping cart on your Event Smart website.
It is also included in the business plan. Want to upgrade to this plan? Make the switch from your My Account page on EventSmart.com.
Want to add the Multiple Event Registration feature to your site?
First, subscribe to the Multiple Event Registration feature. Then login to your Event Smart dashboard and go to Event Smart --> General Settings --> Admin Options. Now look for the Multiple Event Registration Activation option and switch it to Active and then click on the Save button to save changes. The feature will then be enabled on your Event Smart site.
Here’s a quick step-by-step overview of the Multiple Event Registration process:
- Customers are shown a list of events to register for, in which tickets can be added to the “Event Cart”.

- After adding an item to the cart, your attendees/registrants will be shown a "View Event Cart" button on any event, in the list, that they have added. Clicking the "View Event Cart" link link will then take the registrant to the cart confirmation page, where they can then select the number of tickets / pricing options they want, remove events they no longer want, and proceed to registration checkout.

- Customer is taken to a single registration page for all of the events in their cart.

- Customers can reuse information from the first form, across all registration forms on the page, or pick and choose which form data to reuse.

- After the registration forms are completed, the customer is taken to the payment page to finalize the registration.
That’s it! The customer is registered for as many events as they want in one checkout.
Display the Ticket Selector on the Event List Page
To make it easier for attendees to select tickets from multiple events at the same time, you can Display the Ticket Selector on the event list page. Go to Events > Templates > Display Ticket Selector? Y
That way your audience can add more tickets to their cart from one page (as shown above).
The events on the event listing page will receive an "Add to Event Cart" button as shown in the image above. Please note, users can only add tickets from each event individually. Selecting tickets from other events, on the same screen, does not automatically add all selected tickets to the cart. Clicking the Add to Cart button will only add the tickets for that event.
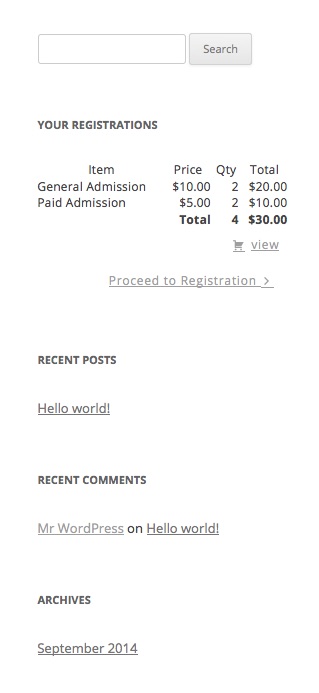
Event Cart Widget
The Multiple Event Registration add-on comes with it's own Event Mini Cart Widget. Simply activate the widget from within Appearance > Widgets admin page.Once the Event Smart Mini Cart Widget is activated, visitors should see it in the chosen location.
 (admin widget view ^ )
Registration Limits
You may notice here that the customer can select multiple amounts of the same type of ticket! The available number of tickets a customer can register for at one time, is determined by the " Maximum number of tickets allowed per order for this event" setting in the individual events.
This can be used to your advantage - by setting numerous pricing options in an event, your customers can buy various ticket types in varying numbers, allowing a greater degree of flexibility for you.
Messaging Workflow
We made some improvements to the messages system that have benefits for when Multiple Event Registration is active. The following overview helps outline some expectations with how messages works with these improvements as they relate to the registration message types:
- Messages are generated for each unique registration status in a transaction matching the message type corresponding to that message type. This means if a transaction has two registrations in it with not approved status (because the Events in the cart for those registration has a default registration status of not approved), and three registrations in it with approved status, then there will be messages generated only for the not approvedregistrations using the registration not approved message templates, and another set of messages generated for the approved registrations using the registration approvedmessage type.
- Event Authors will always receive messages that contain only information related to the registrations on their event(s) for a transaction. So if there is a transaction where all the registrations are approved and its for tickets across three different events, and Event A and Event B is authored by User A and Event C is authored by User B: then User A will receive one message containing only information based on registrations for Event A and Event B, and User B will receive one message containing only information based on registrations for Event C.
- Custom Templates are only used when a message is generated that contains only information pertaining to a single event and that event has a custom message for that message type. So if a registration approved message is generated for the registrant recipient context and it contains information on three registrations across three events, then the global template for registration approved messages is used. However if that was only for one event (Event A) and that event had a custom message template for Event A, then the custom template for registration approved messages will be used.
- When resending messages from the registration list table using the bulk action. The system will automatically group messages into as few as possible for each context and registration represented in the bulk selection. Messages are first grouped by transaction, and then by registration status, and then the expectations listed in the previous points above apply. An important fix that occurred in Event Smart as a result of the improvements made for MER, is that when resending messages in the admin, all active contexts have messages generated. Prior to this fix, only the registrant recipient received messages (or primary recipient if there is no registrant recipient).
Registration Multi-status Summary
This message type provides a summary notification to Primary Registrants and Admin recipients when there are multiple registrations in a transaction with different statuses.

If this setting is not on by default when activating the Multi Event Registration add-on, you can enable it in the Event Smart > Messages > Settings page.
Manually Adding Payments to Registrations
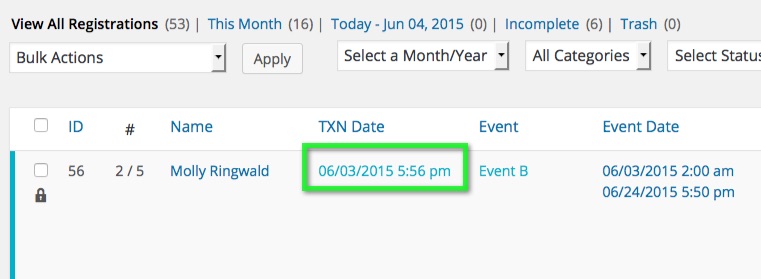
If you plan on allowing registrants to make payments at a later date, instead of paying at the same time they register, then you may find it necessary to apply a payment to specific registrants as opposed to all of the registrants for a transaction. For example, if a customer sends a check to ONLY pay for their registration but not others, then you will need to manually apply that payment to the transaction by visiting the Registrations Admin List table (WP admin > Event Smart > Registrations) and find the registration for that person, then click on the TXN Date link to bring up the transaction details for that registration.
Then click the "Apply Payment" button and fill the out payment details. When the Apply Payment Modal window is open, you have two options for who the payment is applied to:
- All Registrations; or
- Just the following Registrations
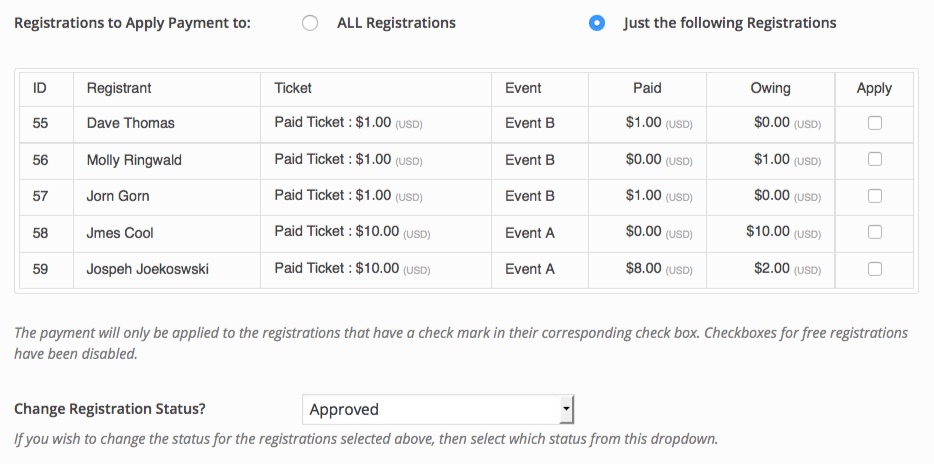
If you select the "Just the following Registrations" radio button, then you will be able to apply the payment to any of the available individual registrations in that list.
Applying Refunds
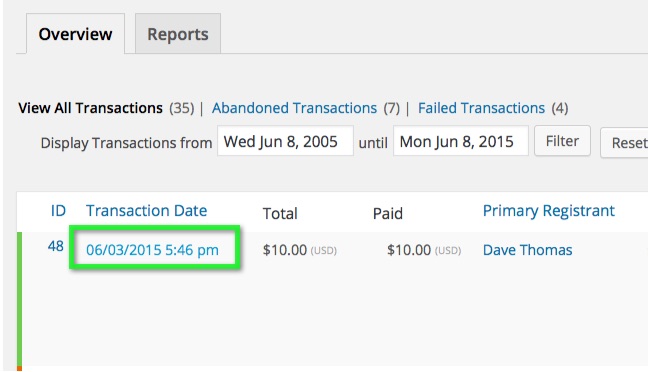
Applying refunds is very similar to manually adding a payment. You can apply a refund via the the transaction, by visiting the Registrations Admin List table (follow the steps above), or through the WP Admin > Event Smart > Transactions List table:
Then click the "Apply Refund" button and fill the out refund details. When the Apply Refund Modal window is open, you have two options for who the refund is applied to:
- All Registrations; or
- Just the following Registrations
Just like applying payments to registrations, if you select the "Just the following Registrations" radio button, then you will be able to apply the refund to any of the available individual registrations in that list.