Events Calendar
The events calendar is an easy way to display and register for events. This document will cover the Event Smart calendar settings, using custom colors for event categories, and troubleshooting common issues.
An active subscription for the Events Calendar feature upgrade is needed to add a calendar on your Event Smart website.
It is also included in the personal or business plans. Want to upgrade to one of these plans? Make the switch from your My Account page on EventSmart.com.
Add the Calendar Page
After adding the Calendar upgrade to your account, go to your Event Smart admin > Appearance > Menus to add the calendar page to your website menu.
- Click the checkbox for the "Event Calendar" page.
- Click the "Add to Menu" button to add it to your menu structure.
- Click the "Save Menu" button.
- View the front-end of your website to make the menu item was added and to make sure the calendar page works.

Calendar Settings
To manage your calendar settings, such as the time and date format, go to Events > Calendar Settings.
Time/Date Settings:
Show Event Time in Calendar: This setting allows you to display the time of the event in the calendar
Time Format: Sets the time format.
The First Day of the Week: Setting this allows you to modify which day of the week shows first in the calendar. Note that it uses a numerical system where 0 = Sunday and 6 = Saturday.
Show Weekends: This setting allows you to remove the weekends from your calendar views. This may be useful if you don’t have events on weekends.
Layout Settings:
Week Mode: Determines the number of weeks displayed in a month view. Also determines each week’s height.
“fixed” – The calendar will always be 6 weeks tall. The height will always be the same, as determined by the calendar height setting or the aspect ratio.
“liquid” – The calendar will have either 4, 5, or 6 weeks, depending on the month. The height of the weeks will stretch to fill the available height, as determined by the calendar height setting or the aspect ratio.
“variable” – The calendar will have either 4, 5, or 6 weeks, depending on the month. Each week will have the same constant height, meaning the calendar’s height will change month-to-month.
Height: Setting this will make the entire calendar (including the header) a height in pixels (e.g. 650).
Display Settings:
Enable images in calendar: The “Featured Image” box in the event editor handles the thumbnail image URLs for each event. After setting the “Enable Calendar images” option to “Yes” in the calendar settings, upload an event image in the built-in media uploader, then click the Insert into post button on the media uploader.
Enable Filters: This allows users to filter events based on category and/or venue.
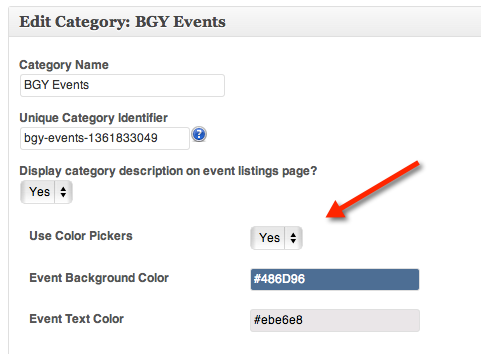
Enable CSS for Categories: This setting allows you to set each category to display a different color. Set each category color in Event Smart > Categories
Enable Category Legend: This setting allows you display a category legend above the calendar.
Use Color Pickers: This allows you to customize the event background color and text color.
Show Tooltips: This allows you to display a short description of the event on hover. Be sure to use the <!--more--> tag to separate the short description from the entire event description.
Tooltip Position: This allows you to customize where the tooltip and tooltip box display in a relative position to the event on the calendar.
Tooltip style: This allows you to set a different color scheme for the tooltips.
Formatting:
Header Style: Here you can define which buttons or controls are at the top of the calendar. Notice the “left:”, “center:”, and “right:” areas. Then assign a button or control to each of those areas.
Example:
left: 'prev, today', center: 'title', right: 'month,agendaWeek,agendaDay,next'
More Info:
http://arshaw.com/fullcalendar/docs/display/header/
Button Text: This setting allows you choose what text (words) you want to display on each button.
Example:
prev: ' ? ', outputs a left triangle next: ' ? ', outputs a right triangle prevYear: ' << ', outputs two left carets (<<) nextYear: ' >> ', outputs two right carets (>>) today: 'today', month: 'month', week: 'week', day: 'day'
More Info:
http://arshaw.com/fullcalendar/docs/text/buttonText/
Title Format: This setting gives you date formatting options
Example:
month: 'MMMM yyyy', is an example of September 2009 week: "MMM d[ yyyy]{ '—'[ MMM] d yyyy}", is an example of Sep 7 - 13 2009 day: 'dddd, MMM d, yyyy', is an example of Tuesday, Sep 8, 2009
For date formatting options, please refer to:
http://arshaw.com/fullcalendar/docs/utilities/formatDate/
Reset Calendar Settings?: If you mess something up, you can always reset the calendar back to factory settings and begin again. Just tick this box and click Save Calendar Options button.
Custom Calendar Pages
You can add one of the following shortcodes into any post or page:
[ESPRESSO_CALENDAR]
Display all current events by default- [ESPRESSO_CALENDAR event_category_id="your_category_identifier"]
Display events of a certain category (also creates a CSS using the category_identifier as the class name) [ESPRESSO_CALENDAR show_expired="true"]
Show expired events, can also be along with the category ID (e.g.,[ESPRESSO_CALENDAR event_category_id="your_category_identifier" show_expired="true"])[ESPRESSO_CALENDAR cal_view="month"]
(Available parameters: month, basicWeek, basicDay, agendaWeek, agendaDay)to change the view type of the calendar, weeks, month, etc.

