New Editor
We know this will sound confusing, but the NEW Advanced Event Editor is an improvement on the OLD Advanced Event Editor. The OLD advanced event editor will be sunset over time and replaced by the NEW advanced event editor. We are sorry for the current confusion between the new and old advanced event editor, but In time the confusion will be eliminated. Thank you for your patience.
Table of Contents
- Modern User Interface
- Card View / Table View Toggle
- Filters
- Bulk Actions
- Per-datetime or Per-ticket Lists
- Ticket Price Calculator
- Support for Recurring Events
- How TOs
- 👉 Modify the ticket sale dates, which are the dates when tickets begin and end being sold.
- Assign Tickets to Datetimes
- Set Minimum or Maximum Ticket Quantities
- Trash and Un-trash Tickets
The NEW advanced event editor allows event organizers like you to set up your events with more control than ever before. The NEW advanced event editor has all the features the old editor had but even more!
Accessing the NEW Advanced Event Editor
New accounts created on Event Smart are automatically configured to use the NEW advanced event editor. If your event website is set to use the OLD event editor, you can switch. To switch to the new editor, navigate to Events > Default Settings > Activate Advanced Editor. Select Advanced Editor and click "save".

Be sure to click the "Save" button to save your changes.
Here is what makes the NEW advanced event editor special.
Modern User Interface
Regardless of whether you're using the NEW basic or advanced event editor, the interface has been updated. You'll notice that buttons and text areas look larger and we've increased the spacing between elements. This is all to make the interface easier to: use, read, and navigate.
The more modern user interface is designed for newer, and continually higher resolution monitors and operating systems that support higher resolutions. Users with "older" (e.g. ~5+ years old) computer screens, monitors or operating systems may find the interface "too big". You can user your browser zoom function to decrease the size and increase the space between design elements.
If you find any broken elements of a page, please take a screenshot and email it to us. Please include the information about your personal computer including:
- Operating system (e.g. OSX, Windows, Linux, etc.)
- Browser
- Browser version number
- Monitor resolution
- Browser window size
The new design will look better and better over time as we all upgrade our personal computer equipment.
Card View / Table View Toggle
The new interface introduces a new Card view. The Card view lays out the datetime and ticket information in a larger format so you can see and edit more information at once.
Example Card View
The Card View dedicates more screen space to granting you quicker access more controls and edit more information.


Example Table View
The Table view minimizes screen space so you can see more rows of information in a consistent format that is easier for comparison.


Filters


You can now filter dates and tickets by the following rules:
- Date
- Status (Upcoming, Active, Next, Sold Out, Expired, Trashed, etc)
- Capacity full
- Custom order (ID, Name, Start Date, etc.)
These filters allow you to find dates and tickets more easily. But be careful, if you can't find a datetime or ticket like you expect, be sure to check which filters are applied. These filters become more and more important and helpful when you manage more dates and tickets, especially with recurring events (more about that later).
Bulk Actions

--

The Bulk Actions are available by navigating to the Table View > and clicking the Show Bulk Actions button.
From there you can edit/add/trash Datetimes and Tickets. This is powerful for event organizers with multiple dates and tickets, especially when using recurring events.
Per-datetime or Per-ticket Lists
With one click you can get a list of attendees that have purchased a certain ticket or signed up for a certain datetime.
While using the Card View, click the number above the "sold" label:

While using the Table View, click the "Registrations" icon:

A new tab will open with the filtered list. To export the filtered list of attendees, click the "Filtered CSV Report" button at the bottom of the page:

Ticket Price Calculator
The Ticket Price Calculator feature allows you to set the price of the ticket based on the top line price or the total bottom price. This can be useful when you have price modifiers such as taxes, fees, or discounts that impact the total ticket price.
Calculating Ticket Price From the Top
The total is being calculated normally from the top to bottom starting from the base price. Entering a new ticket base price will recalculate the ticket total after applying all price modifiers. Click to turn on reverse calculations.

Calculating Ticket Price From the Bottom
Ticket base price is being reverse calculated from the bottom to the top starting with the ticket total price. Entering a new ticket total will reverse calculate the ticket base price price after applying all price modifiers in reverse. Click to turn off reverse calculations.

This is very important and powerful if you want to set final price of a ticket.
Support for Recurring Events

The NEW advanced event editor also supports Recurring Events. Recurring Events is a powerful feature for programmatically creating new events with the same type of dates and tickets in the future with dates in the future. We have a new page dedicated to using the Recurring Events tools.
How TOs
Here are some helpful tips for doing some common things in the new editor.
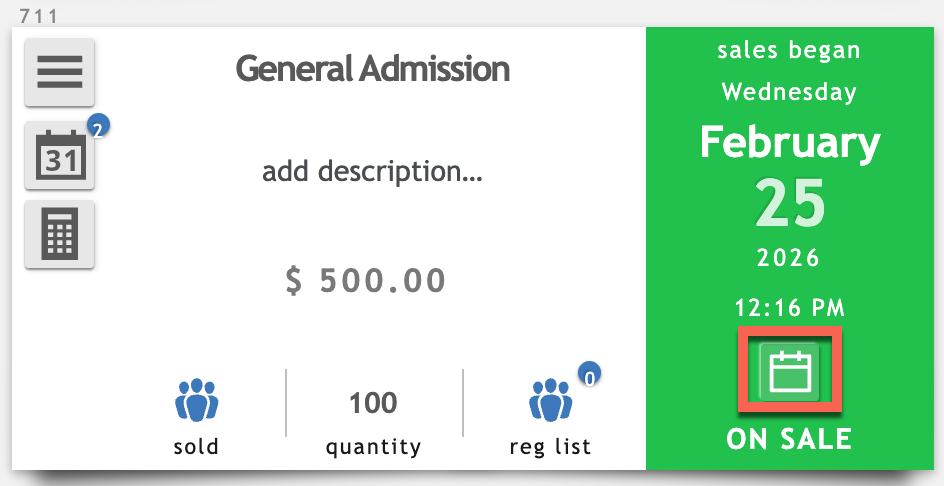
Modify the ticket sale dates, which are the dates when tickets begin and end being sold.
- Navigate to the Event Editor for the event you want to modify.
- Scroll down to the Event Tickets & Datetimes section.
- Locate the ticket you want to edit.
-
On the right-hand side of the ticket, click the calendar 📅 icon
Edit Ticket Sale Start/End Dates 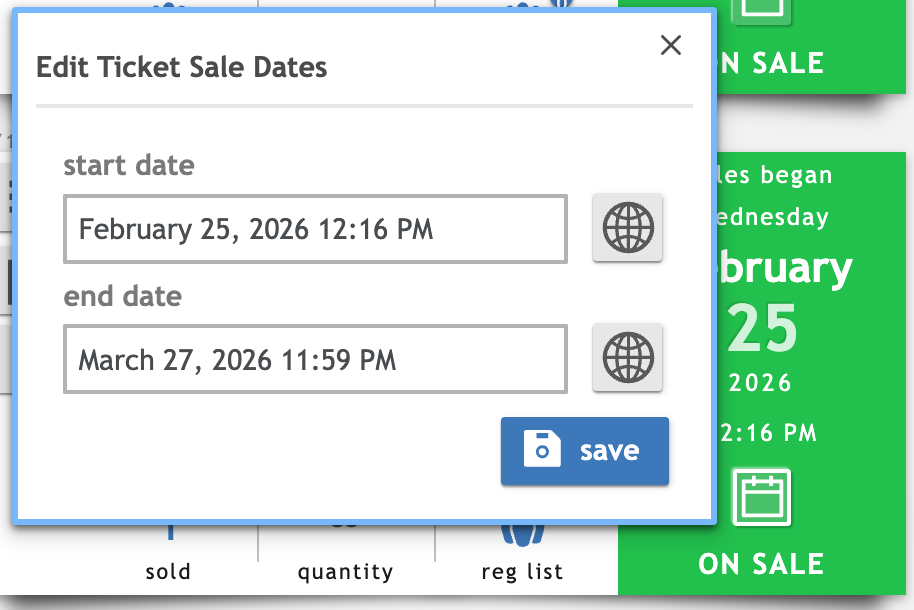
Edit Ticket Sale/End Dates.
- Update the Goes On Sale field with the new date and time.
- Click Save


Notes:
- if your ticket START date is in the future, the ticket will be "Pending"
- If your ticket START date is in the past and the ticket END sale date is in the future , the ticket status may be "on sale"
- If your ticket END date is in the past the ticket will be "Expired"
Reorder Datetimes and Tickets
To reorder your datetimes or tickets, navigate to Show Filters > Reorder Tickets/Datetimes > Drag and drop the datetimes or tickets into a new position > Submit.

Assign Tickets to Datetimes and Datetimes to Tickets (and vice versa)
To assign a ticket to a single/multiple datetime(s) or a datetime(s) to a ticket(s), click the menu icon to edit the datetime or ticket > Assign Dates or Tickets.
Assigning Tickets to Datetimes

Assigning Datetimes to Tickets:

Set Minimum or Maximum Ticket Quantities for Each Ticket Option
You can set a minimum or maximum number of tickets that can be purchased for each ticket during each transaction by:
- Edit your event
-
Click the Edit Ticket button:

-
A modal will open. Scroll down and find the "Details" section. Edit the Minimum Quantity and/or Maximum Quantity

- Scroll to the bottom of the modal and proceed through the ticket options to update the ticket settings.

Trash and Un-trash Tickets
You can trash a ticket by clicking the Hamburger menu for the ticket:

Then click the "Trash Ticket" button:

You will be asked to confirm your action.
Once a ticket is trashed, you can also permanently delete a ticket if necessary. Trashed tickets are hidden from the front-end view, but you can also change your template settings to hide Expired tickets also.
Un-trashing Tickets is done in a similar way.
Click the hamburger menu of the Trashed ticket, and click "edit ticket":

A popup modal will open. Scroll down toward the bottom and toggle the "Trash" toggle to OFF (from blue/active to gray/inactive):

Then proceed through the edit ticket steps to save your changes. Your ticket will then no longer be trashed.